由于之前面试被问到过相关问题,所以学习一下
JVMTI
- 即
jvm tool interface,是Jvm提供的Native编程的接口,可以用来开发并监控虚拟机,查看Jvm内部状态,控制Jvm程序运行。并不是所有的Jvm都支持Jvmti
- 如果要开发Jvm工具,就是要开发一个
agent程序来使用这些接口,实际上就是一个C/C++编写的动态链接库
Java Agent
通过Jvmti开发好Agent程序后,编译成动态链接库,就可以在Jvm启动时加上启动参数,从而使用Agent
-agentlib:<agent-lib-name>=<options>
Agent启动后是和Jvm跑在一个进程中,主要是作为服务端接收客户端的请求,然后调用Jvmti接口返回结果
Instrumentation机制
- 使用Java Agent需要用C/C++编写程序,不太方便,于是在Jdk5推出了
instrumentation机制,直接使用Java即可编写Agent。
1
2
3
4
5
6
7
8
9
10
11
12
13
14
15
16
17
18
19
20
21
22
23
24
25
26
27
28
29
30
31
32
33
34
35
36
37
38
39
40
41
42
43
44
45
46
| public interface Instrumentation {
void addTransformer(ClassFileTransformer transformer, boolean canRetransform);
void addTransformer(ClassFileTransformer transformer);
boolean removeTransformer(ClassFileTransformer transformer);
boolean isRetransformClassesSupported();
void retransformClasses(Class<?>... classes) throws UnmodifiableClassException;
boolean isRedefineClassesSupported();
void redefineClasses(ClassDefinition... definitions) throws ClassNotFoundException, UnmodifiableClassException;
boolean isModifiableClass(Class<?> theClass);
Class[] getAllLoadedClasses();
Class[] getInitiatedClasses(ClassLoader loader);
long getObjectSize(Object objectToSize);
void appendToBootstrapClassLoaderSearch(JarFile jarfile);
void appendToSystemClassLoaderSearch(JarFile jarfile);
boolean isNativeMethodPrefixSupported();
void setNativeMethodPrefix(ClassFileTransformer transformer, String prefix);
}
|
- 上面是
Instrumentation接口中定义的方法,主要关注Transformer,相当于一个转换器,后面类加载的时候都会经过这个Transformer进行处理,相当于可以进行虚拟机层面的Aop
本地方法前缀
- 主要是针对Jni方法,如果想对Jni方法在调用时采用另外一种实现,则可以使用
setNativeMethodPrefix(),当前前提是isNativeMethodPrefixSupported()返回true,即虚拟机支持设置本地方法前缀
例子
- 例如,有一个服务,调用
HelloWorld对象的sayHello()方法,这个sayHello()方法是一个Jni方法,现在想要替换当前服务所使用的sayHello()方法的底层实现,但是又最好不要影响到别的服务,就可以使用设置本地方法前缀来解决
1
2
3
4
5
6
7
8
|
public class TargetService {
public static void main (String[] args) {
HelloWorld helloWorld = new HelloWorld();
helloWorld.sayHello();
}
}
|
上述目标服务调用了HelloWorld对象的sayHello()方法,下面看一下HelloWorld对象:
1
2
3
4
5
6
7
8
| public class HelloWorld {
public native void sayHello();
static {
System.loadLibrary("com_kalew515_HelloWorldImpl");
}
}
|
可以看到sayHello()方法是一个Jni方法,为了搭环境,我们需要先实现这个Jni方法。
使用javac com/kalew515/HelloWorld.java编译该类,然后使用javah -jni com.kalew515.HelloWorld生成Jni方法的头文件:
1
2
3
4
5
6
7
8
9
10
11
12
13
14
15
16
17
18
19
20
21
|
#include <jni.h>
#ifndef _Included_com_kalew515_HelloWorld
#define _Included_com_kalew515_HelloWorld
#ifdef __cplusplus
extern "C" {
#endif
JNIEXPORT void JNICALL Java_com_kalew515_HelloWorld_sayHello
(JNIEnv *, jobject);
#ifdef __cplusplus
}
#endif
#endif
|
接下来就可以写具体实现了:
1
2
3
4
5
6
7
8
9
|
#include "jni.h"
#include "com_kalew515_HelloWorld.h"
#include <stdio.h>
JNIEXPORT void JNICALL Java_com_kalew515_HelloWorld_sayHello (JNIEnv * env, jobject obj) {
printf("Hello World\n");
return;
}
|
然后将Cpp代码编译为动态链接库,方便调用:gcc -fPIC -I /usr/lib/jvm/java-11-openjdk/include/ -I /usr/lib/jvm/java-11-openjdk/include/linux/ -shared -o libcom_kalew515_HelloWorldImpl.so com_kalew515_HelloWorldImpl.cpp,注意路径要相对应地替换,在别的平台上生成动态链接库的方式可能不同,这里展示的是linux平台下生成动态链接库的方式
接下来需要将生成的动态链接库放到java.library.path中,可以通过System.getProperty("java.library.path")来查看。mv libcom_kalew515_HelloWorldImpl.so /usr/java/packages/lib/
接下来运行TargetService程序:

接下来修改HelloWorld类,在原来基础上新增了fakesayHello()方法:
1
2
3
4
5
6
7
8
9
10
| public class HelloWorld {
public native void sayHello();
private native void fakesayHello();
static {
System.loadLibrary("com_kalew515_HelloWorldImpl");
}
}
|
接下来继续进行编译,以及生成Jni方法的头文件:
1
2
3
4
5
6
7
8
9
10
11
12
13
14
15
16
17
18
19
20
21
22
23
24
25
26
27
28
29
|
#include <jni.h>
#ifndef _Included_com_kalew515_HelloWorld
#define _Included_com_kalew515_HelloWorld
#ifdef __cplusplus
extern "C" {
#endif
JNIEXPORT void JNICALL Java_com_kalew515_HelloWorld_sayHello
(JNIEnv *, jobject);
JNIEXPORT void JNICALL Java_com_kalew515_HelloWorld_fakesayHello
(JNIEnv *, jobject);
#ifdef __cplusplus
}
#endif
#endif
|
然后补充具体实现:
1
2
3
4
5
6
7
8
9
10
11
12
13
| #include "jni.h"
#include "com_kalew515_HelloWorld.h"
#include <stdio.h>
JNIEXPORT void JNICALL Java_com_kalew515_HelloWorld_sayHello (JNIEnv * env, jobject obj) {
printf("Hello World\n");
return;
}
JNIEXPORT void JNICALL Java_com_kalew515_HelloWorld_fakesayHello (JNIEnv * env, jobject obj) {
printf("Fake Hello World\n");
return;
}
|
接下来还是进行编译,并将动态链接库放入java.library.path中。
预期实现的效果是不修改TargetService的代码,也就是在代码中调用的还是sayHello()方法,但是实际上会调用底层的fakesayHello()方法。
接下来设置TargetServiceAgent类:
1
2
3
4
5
6
7
| public class TargetServiceAgent {
public static void premain (String args, Instrumentation instrumentation) {
FakeClassFileTransformer fakeClassFileTransformer = new FakeClassFileTransformer();
instrumentation.addTransformer(fakeClassFileTransformer);
}
}
|
这是实现了premain()方法,实际上就是会先于实际Target的main方法之前执行。
1
2
3
4
5
6
7
8
9
10
11
12
13
14
15
16
17
18
19
20
21
22
23
24
25
26
27
28
29
30
31
32
33
34
| public class FakeClassFileTransformer implements ClassFileTransformer {
@Override
public byte[] transform (ClassLoader loader, String className, Class<?> classBeingRedefined, ProtectionDomain protectionDomain, byte[] classfileBuffer) throws IllegalClassFormatException {
if ("com/kalew515/HelloWorld".equals(className)) {
className = className.replace("/", ".");
try {
CtClass ctClass = ClassPool.getDefault().get(className);
for (CtMethod declaredMethod : ctClass.getDeclaredMethods()) {
if ("sayHello".equals(declaredMethod.getName())) {
declaredMethod.setModifiers(AccessFlag.PUBLIC);
declaredMethod.setBody("return this.fakesayHello();");
}
}
return dumpClassIfNecessary(ctClass.getSimpleName(), ctClass);
} catch (Exception e) {
e.printStackTrace();
}
}
return ClassFileTransformer.super.transform(loader, className, classBeingRedefined, protectionDomain, classfileBuffer);
}
private static byte[] dumpClassIfNecessary (String className, CtClass ctClass) throws IOException, CannotCompileException {
final File dumpClassFile = new File("./rasp-class-dump/" + className + ".class");
final File classPath = new File(dumpClassFile.getParent());
if (!classPath.mkdirs() && !classPath.exists()) return ctClass.toBytecode();
try {
ctClass.writeFile(dumpClassFile.getParent());
} catch (IOException e) {
e.printStackTrace();
}
return ctClass.toBytecode();
}
}
|
pom也需要写上Agent的内容:
1
2
3
4
5
6
7
8
9
10
11
12
13
14
15
16
17
18
19
20
21
22
23
24
25
26
27
28
29
30
31
32
33
34
35
36
37
38
39
40
41
42
43
44
45
46
47
48
49
50
51
52
53
54
55
56
57
58
59
60
61
62
63
64
65
66
67
68
69
70
71
72
73
74
75
76
77
78
| <dependencies>
<dependency>
<groupId>org.javassist</groupId>
<artifactId>javassist</artifactId>
<version>3.29.2-GA</version>
</dependency>
</dependencies>
<build>
<plugins>
<plugin>
<groupId>org.apache.maven.plugins</groupId>
<artifactId>maven-compiler-plugin</artifactId>
<version>3.10.1</version>
<configuration>
<source>11</source>
<target>11</target>
<encoding>UTF-8</encoding>
<showDeprecation>true</showDeprecation>
</configuration>
</plugin>
<plugin>
<groupId>org.apache.maven.plugins</groupId>
<artifactId>maven-jar-plugin</artifactId>
<version>3.2.2</version>
<configuration>
<archive>
<manifest>
<addClasspath>true</addClasspath>
<mainClass>com.kalew515.TargetService</mainClass>
</manifest>
<manifestEntries>
<Premain-Class>com.kalew515.TargetServiceAgent</Premain-Class>
<Agent-Class>com.kalew515.TargetServiceAgent</Agent-Class>
<Can-Redefine-Classes>true</Can-Redefine-Classes>
<Can-Retransform-Classes>true</Can-Retransform-Classes>
<Can-Set-Native-Method-Prefix>true</Can-Set-Native-Method-Prefix>
</manifestEntries>
</archive>
</configuration>
</plugin>
<plugin>
<groupId>org.apache.maven.plugins</groupId>
<artifactId>maven-shade-plugin</artifactId>
<version>3.3.0</version>
<executions>
<execution>
<phase>package</phase>
<goals>
<goal>shade</goal>
</goals>
<configuration>
<relocations>
<relocation>
<pattern>org.objectweb.asm</pattern>
<shadedPattern>org.objectweb.asm</shadedPattern>
</relocation>
<relocation>
<pattern>org.apache.commons.io</pattern>
<shadedPattern>org.apache.commons.io</shadedPattern>
</relocation>
</relocations>
<filters>
<filter>
<artifact>*;*</artifact>
<excludes>
<exclude>META-INF/*.SF</exclude>
<exclude>META-INF/*.DSA</exclude>
<exclude>META-INF/*.RSA</exclude>
</excludes>
</filter>
</filters>
</configuration>
</execution>
</executions>
</plugin>
</plugins>
</build>
|
在运行时,只需要通过虚拟机参数传入Agent即可:java -javaagent:target/native-prefix-test-1.0-SNAPSHOT.jar -jar target/native-prefix-test-1.0-SNAPSHOT.jar:

可以看到在没有修改TargetService代码的情况下实现了Jni方法的替换。
原理
实际上上述例子是在加载HelloWorld类时对该类进行了修改,可以查看正常编译的字节码和替换后的字节码,这里用到了idea默认的反编译进行查看,比较直观:
1
2
3
4
5
6
7
8
9
10
11
12
13
|
public class HelloWorld {
public HelloWorld() {
}
public native void sayHello();
private native void fakesayHello();
static {
System.loadLibrary("com_kalew515_HelloWorldImpl");
}
}
|
可以看到原始字节码和原始类能对应上。
1
2
3
4
5
6
7
8
9
10
11
12
13
14
15
|
public class HelloWorld {
public HelloWorld() {
}
public void sayHello() {
this.fakesayHello();
}
private native void fakesayHello();
static {
System.loadLibrary("com_kalew515_HelloWorldImpl");
}
}
|
观察修改后的字节码,可以发现修改了sayHello()方法的实现,变成了调用fakesayHello()方法,从而实现上述效果。
上面的实验是在启动之前通过premain()方法进行替换,实际上当服务跑起来之后,也可以进行热替换,将在后面的例子中进行展示。
热替换
假设有一个服务,在运行中,需要修改启动的某个类的实现,而不重新打包编译整个服务,做到快速替换,则需要使用到热替换技术。
热替换实际上依赖Instrumentation接口的retransformClasses()方法和redefineClasses()方法,前者是修改类定义,后者是重新定义类。
例子
用Spring Boot写一个服务的Demo
1
2
3
4
5
6
7
8
9
10
11
12
13
14
15
16
17
18
19
20
21
22
23
24
25
26
27
28
29
30
| @RestController
public class TestController {
@Autowired
private TestService testService;
@GetMapping("/h1")
public String testInterface () {
return testService.sayHello();
}
@GetMapping("/h2")
public String testInterfaceNew () {
return new TestService().sayHello();
}
}
@Service
public class TestService {
private AtomicInteger curr;
public TestService () {
curr = new AtomicInteger();
}
public String sayHello() {
return "hello: " + curr.addAndGet(1);
}
}
|
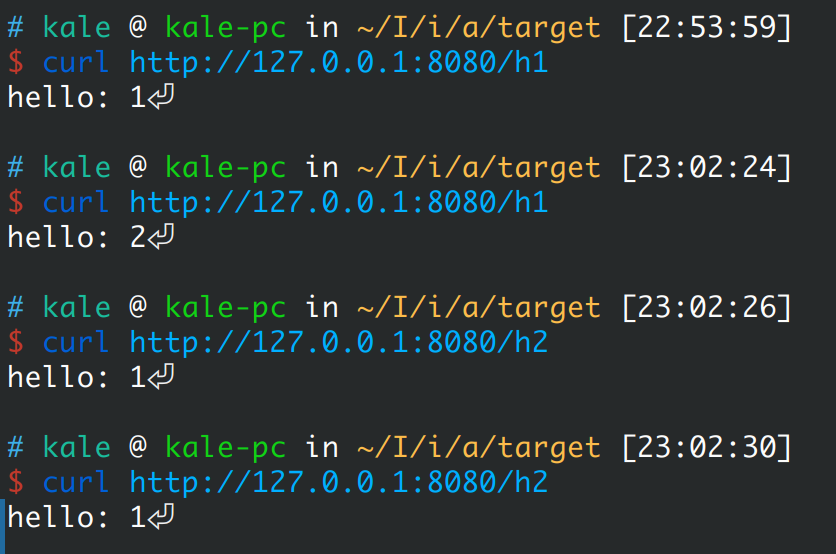
可以看到这个服务对外提供了两个接口,其中h1是调用自动注入的testService对象的sayHello()方法,h2是重新实例化一个testService对象,调用其sayHello()方法,这里同时还会返回调用的次数:

启动前替换需要在代理类中是实现premain()方法,而热替换则需要在代理类中实现agentmain()方法:
1
2
3
4
5
6
7
8
9
10
11
12
13
14
15
16
17
| public class AttachAgent {
public static void agentmain(String args, Instrumentation instrumentation) {
System.out.println("attach agent loaded");
Class[] classes = instrumentation.getAllLoadedClasses();
instrumentation.addTransformer(new AttachAgentClassFileTransformer(), true);
for (Class aClass : classes) {
if ("com.kalew515.service.TestService".equals(aClass.getName())) {
try {
instrumentation.retransformClasses(aClass);
} catch (Exception ignore) {
}
break;
}
}
}
}
|
可以看到上面代码是先添加了一个Transformer,然后获取所有已经加载的类,遍历,如果发现了需要修改的类,则调用instrumentation.retransformClasses()方法,进行重新转换类的流程
其中,Transformer如下:
1
2
3
4
5
6
7
8
9
10
11
12
13
14
15
16
17
18
19
20
21
22
| public class AttachAgentClassFileTransformer implements ClassFileTransformer {
@Override
public byte[] transform (ClassLoader loader, String className, Class<?> classBeingRedefined, ProtectionDomain protectionDomain, byte[] classfileBuffer) throws IllegalClassFormatException {
if ("com/kalew515/service/TestService".equals(className)) {
try {
ClassPool aDefault = ClassPool.getDefault();
aDefault.insertClassPath(new ClassClassPath(TestService.class));
CtClass ctClass = aDefault.get(className.replace("/", "."));
for (CtMethod declaredMethod : ctClass.getDeclaredMethods()) {
if ("sayHello".equals(declaredMethod.getName())) {
declaredMethod.setBody("return \"Fake Hello: \" + curr.addAndGet(1);");
}
return ctClass.toBytecode();
}
} catch (Exception e) {
e.printStackTrace();
}
}
return new byte[0];
}
}
|
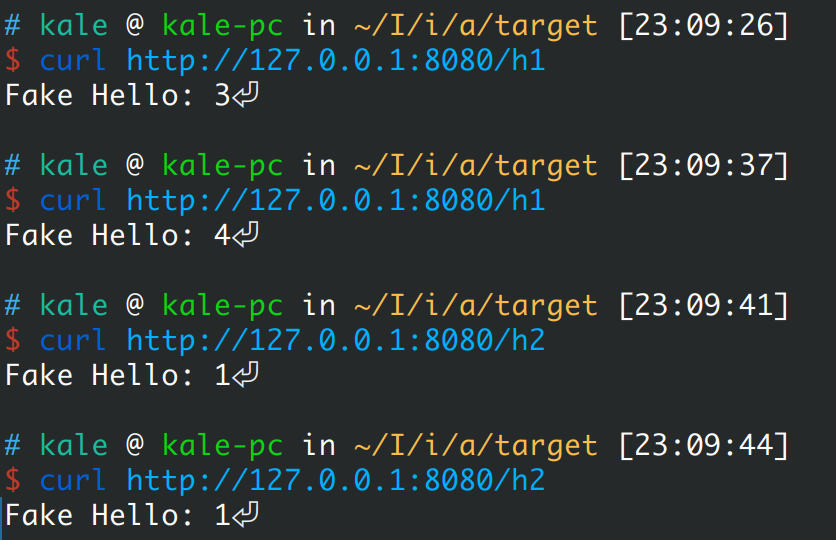
可以看到,上面通过Javassist技术修改了TestService类的sayHello()方法的实现,将其返回值修改为了Fake Hello: [调用次数]
Pom也需要写上Agent的内容,和上面的区别不大,这里就不再贴出了
启动服务后,则需要找到对应的Jvm,并loadAgent:
1
2
3
4
5
6
7
8
9
10
11
12
13
14
| public class AttachJvm {
public static void main (String[] args) throws IOException, AttachNotSupportedException, AgentLoadException, AgentInitializationException {
List<VirtualMachineDescriptor> list = VirtualMachine.list();
String jarPath = "/home/kale/IdeaProjects/instrumentation-test/attach-agent-test/target/attach-agent-test-1.0-SNAPSHOT.jar";
for (VirtualMachineDescriptor virtualMachineDescriptor : list) {
if (virtualMachineDescriptor.displayName().endsWith("TargetAttachService") || virtualMachineDescriptor.displayName().endsWith("attach-agent-test-1.0-SNAPSHOT.jar")) {
VirtualMachine attach = VirtualMachine.attach(virtualMachineDescriptor.id());
attach.loadAgent(jarPath);
attach.detach();
}
}
}
}
|
可以看到上述程序先获取了在运行的虚拟机列表,然后遍历,找到目标Jvm,然后将准备好的Agent Jar进行load,从而达成效果
由于上面的服务中设置了两个接口,这里主要是为了测试是否需要重新new新的对象才会有效果还是说以前的实例化的类也会进行替换:

可以看到,以前实例化的对象也会起到效果,并且不是重新实例化了新的对象,因为可以看到计数并没有重新开始
原理
首先解释一下attach机制,随便写一个程序,并打印当前所有线程:
1
2
3
4
5
6
7
| Threads size is 6
Thread name: Reference Handler
Thread name: Finalizer
Thread name: Signal Dispatcher
Thread name: main
Thread name: Monitor Ctrl-Break
Thread name: Common-Cleaner
|
1
2
3
4
5
6
7
8
9
10
11
12
13
14
15
16
17
18
19
| public class PrintThread {
public static void main (String[] args) {
ThreadGroup group = Thread.currentThread().getThreadGroup();
ThreadGroup topGroup = group;
while (group != null) {
topGroup = group;
group = group.getParent();
}
int slackSize = topGroup.activeCount() * 2;
Thread[] slackThreads = new Thread[slackSize];
int actualSize = topGroup.enumerate(slackThreads);
Thread[] actualThreads = new Thread[actualSize];
System.arraycopy(slackThreads, 0, actualThreads, 0, actualSize);
System.out.println("Threads size is " + actualThreads.length);
for (Thread actualThread : actualThreads) {
System.out.println("Thread name: " + actualThread.getName());
}
}
}
|
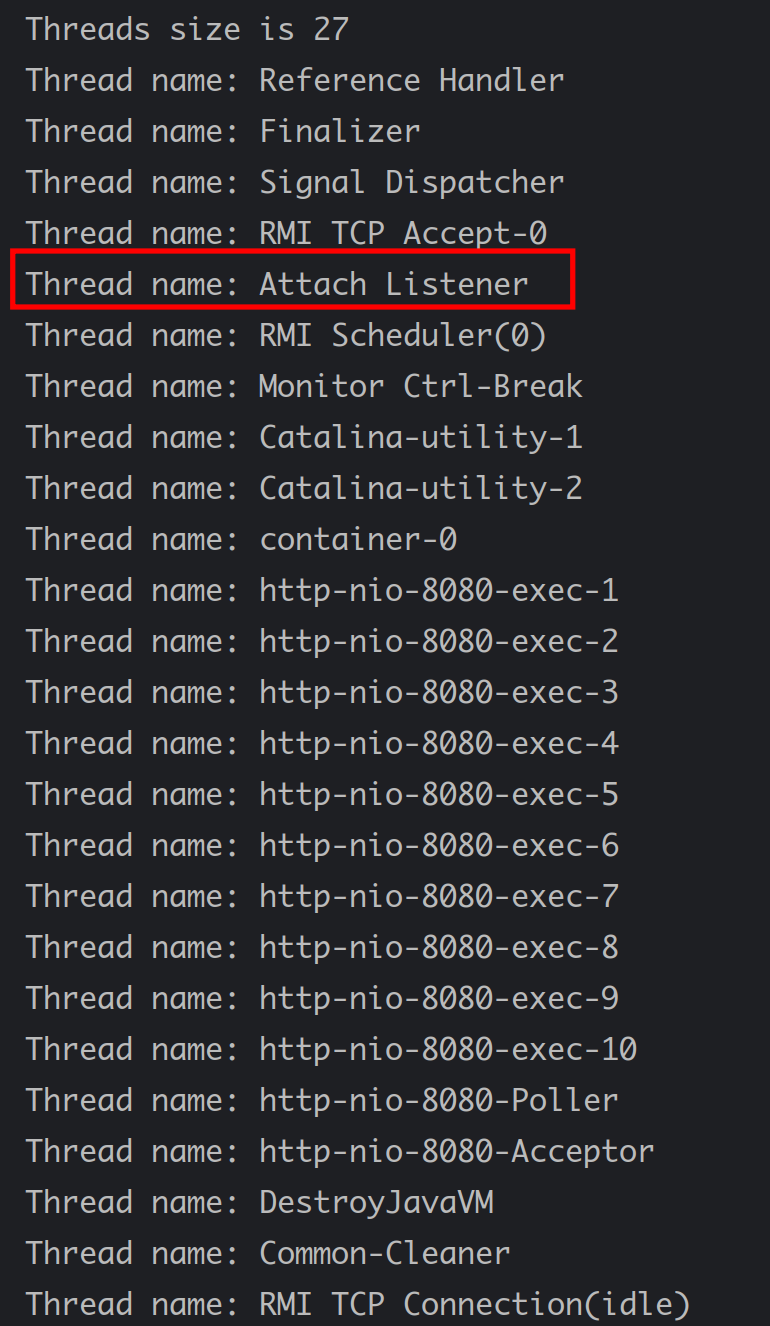
可以看到再简单的程序,其实都不止一个线程在运行,其中有一个Signal Dispatcher线程,实际上就是处理信号的,而当发起attach信号时,就会出现新的attach线程去处理attach事件:

为什么类重新加载后对以前实例化的对象也会产生影响呢
- 这是因为对于一个类来说,分为属性和行为,属性是对象私有的,每个对象需要单独存储在堆中,而行为实际上是对象间公共的,当然,在行为中可能会操作对象的私有属性,所以当类重新加载,修改了类的行为对象之后,对以前实例化的对象也会产生影响


